DESI1212 Submission
Thea Jacobsen 000940748-0
TABLE OF CONTENTS:
D1 : ILP
Overview
Roles and Learning Outcomes
Mark Breakdown
Milestone Development
Review Date
D2 : SCHEDULE
Original Schedule
Updated Schedule
D3 : EVALUATION
Evaluation of Personal Work
Evaluation of Project
D4 : PORTFOLIO
Introduction
Concept Art
Rigging
Character Animation
Clothing Simulation
Summary
Refrences
D1 : ILP
Independent Learning Plan for DESI1212
Thea Jacobsen 000940748-0
Overview
I am focusing on the character animation for our game. In industry, a character animator is often expected to do their own rigging, thus rigging and weight painting is also included in my job role.
I will work on efficiently creating a rig that can help support the realistic style of the game, that will be functional in both Maya and Unity.
I will create a full set of animation cycles for game characters. My focus will be on working fast under a strict deadline, while still trying to achieve sufficient results. Whilst my original focus had been on creating detailed animations that strengthened the character’s personality and the game’s situation, due to pipeline issues that has now become a lesser priority. The focus being completing my job on time.
To complete this job role I need to look into how to optimise animation for a game and the best way of segmenting the animation cycles so that they can be triggered seamlessly. Furthermore, I hope to be able to look into clothing simulation, however, this will depend on how the pipeline progresses.
I will also delve shortly into the concept art stage of the character design phase, in an attempt to solidify and combine the group's common ideas, but also to aid the character modeller in the creation of the characters.
This involves going research about Icelandic culture and clothes and also looking into how children dress, all while taking into consideration the context of the game and how the design impacts the gameplay. For this part of my responsibilities, I will also be working closely with Pia, our character modeller who also will have a hand in the design process.
Roles and Learning Outcomes
Character Concept Artist
This task illustrates Learning Outcome 3, 4, 5 and 6 for DESI1212.
3. Assess different methods of designing and/or developing Multiplayer games
I will be designing the character to work for a multiplayer game, taking into account the use of different silhouettes and colour palettes to easily differentiate the character when playing on the same map.
4. Employ advanced techniques in the design, development and process management of digital games
I will further work on the advanced elements of character design, such a how the design implicates the playability of the character. And how to portray the different character’s gameplay mechanics through their design.
5. Appraise the social, legal, ethical and social impact of gaming
When designing I will consider the social implication of the design and whether the characters will positively or negatively impact the player. I will make sure that the character created work within the social context of the game, while still finding the best way to create diversity.
6. Demonstrate the origins of their ideas by referencing sources used in their work
I will be documenting my design references and research sources.
Character Animator
This task maps onto Learning Outcome 1, 2, 3, 4 and 6
1. Evaluate appropriate software techniques and products to develop a complex 2D and/or 3D games.
I will make sure the animation is optimised for use within Unity and use techniques appropriate for the transition between Maya and Unity.
2. Construct a working game prototype.
The contribution of character animation will help create a well rounded game, and it will strengthen the gameplay experience.
3. Assess different methods of designing and/or developing multiplayer games.
I will take into account the multiplayer factor when animating the characters, such as making them easily differentiated through character movement. I will also follow a strict schedule to the best of my ability to make sure that I deliver on time and don’t slow down the pipeline of the game as a whole.
4. Employ advanced techniques in the design, development and process management of digital games.
I will be looking into the intricacies of animation for games, and push the limit between realism and stylization in order to create a vivid performance that reads well, but still works within the frames of realism. I will further my competence as a character animator, by rigging the characters myself. Thus, following the professional requirements for someone with my job role and becoming a more well rounded artist.
6. Demonstrate the origins of their ideas by referencing sources used in their work.
I will be documenting my references and research sources.
Mark Breakdown
Character Concept Artist : 20 Marks
Character Animator : 40 Marks
Rigging: 30 Marks
Cloth Simulation: 10 Marks
Milestone Development
Character Concept Artist:
Research and draft completed by October 2018
Final Design by start of November 2018
Additional designs created by demand throughout the pipeline
Character Animator:
Research phase completed by January 2019
Rigging Sister start 20/02/2019
Animation Start start 10/04/1019
In Game Character Animation completed by 25/04/19
Animations Required: Estimated time
1 Day = 8 hours

Review Date
I reserve the ability to change my ILP depending on variations in tasks that might arise during the progression of the course. This includes, but is not exclusive to, changes in mark distribution and additions or subtractions of job roles.
I want to review this in March 2019 and then have the final ILP submitted before the final submission date of the course, 6th of May 2019.
D2 : SCHEDULE
Original Schedule
Character Concept Artist:
Research and draft completed by October 2018
Final Design by start of November 2018
Additional designs created by demand throughout the pipeline
Character Animator:
Research phase completed by January 2019
Rigging Girl start 20/02/2019
Animation Girl start 22/02/1019
Rigging Boy start 12/03/2019
Animating Boy start 25/03/2019
In Game Character Animation completed by 09/04/19
Cut-Scene Animation completed by 15/04/19
Animations Required: Estimated time
1 Day = 8 hours

Updated Schedule
Character Concept Artist:
Research and draft completed by October 2018
Final Design by start of November 2018
Additional designs created by demand throughout the pipeline
Character Animator:
Research phase completed by January 2019
Rigging Sister start 20/02/2019
Animation Start start 10/04/1019
In Game Character Animation completed by 25/04/19
Animations Required: Estimated time
1 Day = 8 hours

D3 : EVALUATION
Evaluation of Personal Work
My part in this project was for a long time only supportive. As my "real" work did not start until very late in the pipeline I made sure to do what I could in the earlier stages to be a good group member. I would help organize the group meetings by booking out rooms and being there on time. In said meetings, I would always offer my opinion when needed. Outside of meetings I made sure to be in class as much as I could. I helped convey information to the missing members and acted as support in presenting for the absent members so they could continue working where it suited them best. Initiatives like this are what I focused on doing while I waited for the animation process to begin. I would, of course, be creating concept art in this time as well, but that was on a more sporadic basis rather than continuous work. Therefore, I made it my job to be a helpful group member that showed up on time and contributed where I could. Whether this had a huge effect on the project as a whole is hard to say. But being able to present for people when they were not in class is likely the most helpful thing I could have done without actually getting involved in other people's work.
In terms of the work I have produced for the group I have mixed feelings. On the one hand, I know I have done my utmost to be able to fulfil my task on time and at a reasonable level. I am pleased with my ability to work under pressure and enjoyed the challenge it was. Additionally, I have learnt a lot about cloth simulation and how that works in Maya. Something I will now be confident in working with, and further exploring, later. I have also learnt how to rig a character fairly quickly and although using HumanIK did not give me the chance to create a skeleton from scratch, It did teach me a lot about how a skeleton should be set up in relation to the mesh.
In terms of the animation, I feel I managed to create a decent set of animations that illustrated the core movement of the task. I, however, did not manage to create a highly detailed personalized set of animations, which was my original idea when we started this project. Later I redefined my goal as “... working quickly and efficiently under a strict deadline” (See D1: ILP for more details on this) I have managed to create some elements of personalization, something I explore in greater detail in D4: Portfolio. In retrospect, I should have started practising animation much earlier. I did do this to some extent, however, the tests were mostly in relation to the rig and how the mesh was deforming. If I had spent more time animating, I would have gotten a better sense of how each action could accentuate the character's attributes. Admittedly, since these animations would just have been discarded I felt I had more productive things to spend my time on. I see now that this extra work would have benefitted me and the project as a whole. If I were a more confident animator I would have been able to produce even better work under pressure and would have felt more comfortable being put under such a strict time schedule. Ultimately, I am pleased with the work I have done. I delivered in time of the deadline I had set with the programmers and I managed to integrate new elements, such as the backpack (More information on this in D4: Portfolio), even though they were delivered to me on the day before my deadline (30th of April). I have also learned a lot from working in a situation that forces me to be depended on someone else's work. Even though things did not go according to schedule it has been mostly a good experience. as for me and the character modeller, Pia, had open lines of communication throughout the process. Whilst the animation process is what challenged me the most, the process of rigging and weight painting has made me a more rounded 3D artist. My biggest regret in this project was my inability to implement the cloth simulated animations. The clothing simulation attributed a lot of realism to the animations and overall raised the visual impression of the work, which was in line with what we wanted to achieve with the game itself. In exporting the clothing simulation is where I felt the most at loss with my own ability. I should have foreseen the inevitable issue and tried to export the simulation into Unity much earlier in my personal pipeline. However, I got preoccupied with being able to complete the animation and simulation for all animations, that I did not pause to think about the export. I had assumed that baking the animation would work seamlessly, but that is not enough and I should have done a better job of testing out the transfer between the two softwares. Although I feel confident I would have been able to export it before the submission, we would not have had time to implement it and as I am not the one implementing the assets, I did not want to add additional pressure onto other members of the group, due to my error. This mistake was a valuable lesson for me to not make assumptions and to always test out the workflow between softwares, especially when you are dealing with advanced techniques. However, I am glad that I tried simulating cloth because before this project this seemed like something I would not be able to do, but now I am confident in using the Maya physics engine and working with simulations is not as much of a hurdle as it had been before. I have learnt not only how to simulate cloth, but I have also learnt that foolproofing your workflow before spending time creating high detail assets should always be the first thing you do in any project.
To conclude, overall I am pleased with my part in this project. I have done my best to be a good group member throughout and I completed my tasks in line with the predetermined deadlines. However, I recognize my mistakes in not experimenting and researching animation and cloth simulation export. If I had done that earlier in the pipeline I would have been able to produce work quicker and at a higher level than I have done now. In the future I will work on making sure everything is prepared and tested before my work starts, thus I would be able to smooth out my own workflow and ultimately help the project as a whole move more efficiently.
Evaluation of ProjectEvaluation of Project
The project as a whole suffered a couple of fatal mistakes. The first being that we should have had a designated project manager. However, no one wanted to take on that role and as a group of peers in an academic situation, we can not force someone to do a job they do not want to do. It is hard to say whether having a project manager would have solved our pipeline issues, but It is probably the only thing that might have helped. Speaking as a person who is usually the project manager in situations like this I know that is it almost impossible to get students to do complete work in time with a schedule if they decide that another project is more important or just don't want to do it. Some members of the group did not manage their time in a good way and thus retracted from the group becoming more and more difficult to get in touch with. This was the biggest problem, as they, in turn, prevented other people from being able to do their job and ultimately leading to the game becoming a heavily distilled version of itself. Many key members of the group had decided that they would "fix the work in the last week". This is why if we had had a project manager that had set stricter deadlines for the entire group then maybe some of those extreme delays could have been rooted out. A project manager could also have helped establish a good set of guidelines when using Git. We chose to use Git to manage our project. It compiled project changes automatically and allows people to access and update the file remotely without overwriting other people’s work. We had a lot of trouble with files being corrupted or overwritten. Some of these issues were due to Git itself, but a lot was due to human error, where multiple group members would work on the same project and not treat the file in the right way when uploading their files back into Git. A project manager would have been a good aid here as they could have helped organize the confusion around how to properly use Git and thus, saved us the time spent trying to rescue lost work.
In terms of making the actual game I feel most of us were on the same page in terms of what we wanted from the game and how we saw ourselves in the group. We mostly agreed on ideas concerning the style and would discuss any disagreements in group meetings both in and outside of class. The game had the potential to be a fully fledged game, but a trend arose of people spending a lot of time working in extreme detail on one asset. To complete the vision we had originally had people would have had to be stricter with themselves in not continuously reworking the same assets to perfection, but rather focus on creating the assets needed. This is not to say that people should not work in detail and take their work seriously, but at some point, one needs to look at the pipeline as a whole and evaluate what one has time to do and what the project derives. It is hard to compare my personal experience in this project with that of the other members. My work was under extreme time pressure, whilst most other group members have had the whole year to work, thus, it is hard to say what I would have done were I in their situation. But I like to equate it to if I had decided to only work on one walk cycle in order to get that to a perfect level and then not completed the other animations in time. That walk cycle would have been a good portfolio piece, but it would not benefit the project as a whole. I want to make it clear that I respect my fellow group members for their artistic ability and think they have created some beautiful assets. But we have a handful of gorgeous assets next to some lower quality ones that were made out of necessity. Personally, I would rather have the whole game on a slightly lower level with a consistent style, than some stand out assets. However, it is important to note that many of the group members learnt a lot during this project and explore new methods and techniques that ultimately help them grow as artists. Criticizing the pipeline does not benefit anyone, the most important thing is that the people involved learnt something during the process. The majority of the group worked hard on creating gorgeous assets and may have gotten lost in perfecting one aspect rather than looking at the project in its entirety. But at least they were working hard and contributing to the game in some way. Which some people did not do, this goes back to what I mentioned about people prioritizing different coursework. A couple of members of the group became increasingly difficult to get in touch with, which led to the final months of work becoming very unorganized. We tried our best to fix this by having semi-regular meetings and open lines of communication, but it just was not enough. As I mentioned earlier having a project manager might have helped smooth out these issues, however, speaking from personal experience, it usually does not and just ends up causing the manager a lot of stress.
In conclusion, I am proud of the work we have done. The number of people in the group who actually communicated with each other worked well together and produced good work. However, the pipeline was messy and unorganized due to people not keeping to their personal deadlines, causing perpetual delays to the project's overall progression. But in most cases those people were working hard to improve their skill, which is ultimately the goal of an academic institution, thus they can’t be faulted for working hard. To solve this we could have had a designated project manager, but ultimately there is little one can do to force a person to do work. The project suffered because of this, but most of the key elements we wanted are there and we can be proud of that.
D4 : PORTFOLIO
Introduction
The scope of work was to create an online multiplayer game for PC. As a group, we quickly discovered a collective desire to make something that focused heavily on atmosphere, and had detailed and realistic assets, while still being optimized for a game. We decided the best way to create a rich atmosphere was to place the game within a narrative, which explored attributes of a world of our own creation. The gameplay itself would be based on games like "Last of Us", that features stealth and scavenging within a rich environment. However, it is important to note that games like that also feature combat elements, which we had decided to avoid. We made this decision based on the time and care it takes to create and as a group, which had not worked together before, we did not feel confident we would be able to create that. Thus, we focused on stealth and survival. In terms of the style, we knew we wanted to pursue realism. The work of Swedish artist Simon Stålenhag was used as a reference for the group. His work often features a combination of rural Sweden and sci-fi machinery, casting a light on what daily life in a high tech world could look like. This contrast between traditional and modern, nature and machine, appealed to us as a group and we decided to use this as our lead style reference. The idea arose to set the game in a small Icelandic town, invaded by aliens in the near future. The choice of Iceland was due to its mystical connotations, it is an island with dramatic geography and ancient ties to Norse mythology. This gave us an interesting base to play on and further build the contrasts that are seen in Simon Stålenhag's work. We landed on a story focusing on two children trapped outside after curfew in a town overrun by aliens active during the night, unable to get back into their home. They need to stealth around and survive the night, whilst exploring the lore of the town and uncovering the secrets of why the aliens arrive and what they are doing.


Concept Art
It is important to note that I only created concept art for the characters. I was not involved in the concept art for the environment or the alien technology. That job fell to the people responsible for modelling those respective assets. A character concept artist creates art that establishes the appearance of a character. This helps the character modeller know what they need to model and what the textures should look like. As I mentioned in my ILP, my role as a concept artist was on a rolling basis. Traditionally, character concept artists usually work in the pre-production stages of a project, however, for this project I viewed my role as more of a support to the team, providing designs and previsualizations when requested. This would be specifically in regards to the character modeller and what she needed to guide her work. We were both involved in the design process, as she would come with ideas and requests that I would implement. I felt it crucial to let her have some creative input in the character she would be modelling.
Building on what the group had decided, I started compiling our ideas and designing the main characters for the game. We had decided on two siblings between the age of 7 and 14. This choice made to justify why we did not have combat in the game. Concerns were raised that if the characters were adults they would surely fight their way out of the situation, but if they were kids it would be natural for them to be scared and just focus on survival. Additionally, we intended that by playing as children you would be limited in skill and scope, thus, the threat of the aliens would feel more imminent as the player would be more helpless, than if they had access to brute force or weapons. To create a bigger distinction between the characters we initially decided for them to be brother and sister, thus we could have a more prominent differentiation in their size and silhouette and making them easier to tell apart in a dark, night time environment. However, this would later change, something I will discuss in detail later.
My personal design ethos as an artist is to always challenge the expected. I enjoy creating characters that sometimes are at odds with their environment as this can create an interesting discourse and thus create depth to a character that would otherwise feel generic if created in line with stereotypical expectations. I did some experimentation with a younger Caucasian sibling pair, I gave them brown hair to try to create some deviation from the stereotypical blond hair and blue eyes one usually envision when thinking about Scandinavian people. However, these designs felt slightly uninspired. A suggestion was raised by Pia, the character modeller, to have the siblings be mixed race, an idea I also had toyed with and even drafted a sketch of. With the group in agreement, I started finalizing the designs. This choice might seem random, but our reasoning based itself on how the narrative takes place approximately 10 years in the future. The world as a whole has seen a rise in migration between countries and the expected racial demographics of most countries are being diversified, we expect this trend to continue into the future and we felt a good way to express this would be by having the children be mixed-race, a product of an integrated society. Additionally, with Iceland ranking number 4 on the World Happiness Scale, (Worldpopulationreview.com, 2019) people might come to Iceland to seek a life of remote happiness.
As for the design itself, the core idea was to portray the characters as simply dressed with elements of traditional Icelandic knitwear and timeless children's clothing. The game is set in a small town so we did not want fancy clothing, the focus was rather on warm and functional. Iceland being at a latitude of 65 degrees North (Long, 2019) is a temperate country with cold winters, the game is set in mid- to late autumn. Thus, their clothing needed to be warm. The original plotline called for them to be left outside accidentally and then later collect more clothes and items from their nearby tree house. However, later the story was changed to have them intentionally go outside and then collect items from the treehouse as a part of their preparations to sneak outside past curfew. Either way, the clothes needed to be passable as inside clothes, but warm enough as outside clothes. From a technical perspective, I had the intention of creating cloth simulation as this would enhance the realistic style we targeted, however this was scraped when we encountered problems importing.
Figure 1: First Draft
Figure 2: Second Draft
At this point I had done some experimentation and had a pretty good idea of what I wanted to pursue. I did some research into icelandic knit and found some refrences to base the desings on.


Figure 3: Final Draft Brother Variant 1
Figure 4: Final Draft Brother Variant 1
Figure 5: Final Draft Sister
I briefly mentioned that the characters were originally meant to be brother and sister, but that that later changed. This change occurred on the 7th of April, when the character modeller suggested changing this to be two identical sisters instead. This choice was made out of necessity as the character model of the sister had taken much longer than expected and only just been finished on the 7th as well. With only one month left before submission, and the sister still needing to be textured, rigged and animated, creating, rigging and animating another character was no longer a viable option. Thus, changing to only reuse the same character model was the only reasonable solution given the time constraints. I will go into detail about how this affected the animation process later. The character modeller requested help in figuring out how to distinguish the two characters, I suggested having a different colour on each of them and changing the hairstyle, as this would at least create a slight differentiation on the silhouette. The modeller was unsure if she would be able to create new hair in time, so we settled for just different colours.
Figure 6a:
Figure 6a is a concept of the updated design for the sisters, the colours were chosen to stand out in the environment as we had gotten feedback that the environment was monotonous in colour. I avoided colour with a blue tint since that is the most dominant colour in our environment. I carried through the yellow from the original design of the sister but made other elements of her design yellow-tinted as well. Figure 6a was a colour variation I did where each of the chaaracters had the same colour scheme but on different items. However, I felt it would be clearer for the player if the character’s had one main colour each (Figure 6b) instead of multiple colours. The clear distinction between yellow and pink would make it easier to distinguish them from each other, this is extra important since our game is a multiplayer game. Where two players are navigating the same environment you want to avoid the players mistaking themselves for the other character. Additionally the inverting of the jumper would tie their design together, but also make them clearly different. It was also convenient for Pia, who would be able to create one texture and invert it, ultimately saving more time. In this drawing you also see the pink sister having a different hairstyle, this was just in case Pia would have time to create new hair, which she did not. The design idea behind it was to try and create a different silhouette between the two of them. The bottom-heavy hair for the sister would contrast the updo of the yellow sister.
Figure 3 and 4 show variants of the original brother design. I made two versions because in our original gameplay plan we had intended the brother to be stronger with the ability to carry more, but he would also be less stealthy. I first drew the cameo jacket as it seemed like a reasonable thing to have lying around in a tree house. Then later I drew the reflector jacket as it would help emphasize the idea that he was less stealthy and it gave a good opportunity to work with reflective materials. If implemented seeing the drone’s light reflected in the jacket would be a very interesting effect to work with. He is also wearing oversized wellies to show that they’re not his and that he finds them in the treehouse later. He is also wearing a traditional Icelandic knitted sweater to tie into the country in which the game is set.
Figure 5 is the final design for the sister. She is wearing a knitted sweater, thick wool tights and wool stockings. I also gave her some yellow shorts over the tights because it feels distinctly childlike and it also signifies that the game is set in autumn, a transitional period between summer and winter. Shorts being a summer orientated clothing piece and wool tights being more winter associated. In terms of her hair, I designed it as a set of hair buns, but one had come loose during the struggle to get outside. I felt this would strengthen the character’s distress and be a unique choice that would break up the symmetry of the design. However, the modeller elected not to include it and instead went for having two buns.
In the final concepts (Figure 4 and Figure 5) I drew them with bruises and scratches. Because in the first version of the story the sibling ended up outside by accident. I imagined they would have some injuries, this would also further add to the character’s distressing situation. It would also give a good base for creating some interesting animations, working with their physical state to create something more individualised. At least that was my original intention, however, that was later changed as the pipeline progressed and we made changes to both the characters and the story.
Figure 6b: Sisters Recoloured
There was also demand for a new backpack design. Originally, the brother was meant to have a backpack, but now one of the sisters would instead. This would help somewhat differentiate them in appearance, which was crucial now that the characters were identical twins. I created some backpack designs with variations in colour and style, and with help from the character, modeller chose the one we liked the most. I also experimented with some embroidery patterns to help create some detail to the design.
Figure 7
Figure 8
Figure 9
Figure 10
Figure 11
Figure 12
Figure 13
Figure 14
Figure 7-13 shows various backpack designs I did, with Figure 13 exploring variations in embroidery.
FIgure 15
Figure 14 shows the final backpack design, this was a collaboration between me and Pia. I drew the concepts, but based on her opinion and feedback, we made the choice of this version. Originally we had liked the Fjellreven backpack, but since it is a very recognisable shape we worried it would be a legal issue to copy their design, thus we chose something more basic and rather decorated it to make it stand out a bit more. We made it pink to match the sister’s colour palette and because we wanted to avoid blue since we had received feedback that the environment was too monochromatic, with everything looking slightly blue. The embroidery is meant to look like children’s drawings giving the impression that they made it themselves. It also features an angry looking drone which is a big part of our gameplay. Figure 15 show’s some keychain decorations that could also help decorate the backpack. In the end, we chose the compass and the runestone with an old Icelandic protection rune. I also incorporated the Vegvisir rune, which is a wayfinding rune meant to help travelers through storms, (Guide to Iceland, 2019) on the backpack as this is a feature of our main menu UI.
Figure 16 is a concept I did for a priest character that lives in the church that the kids go to later in the game. The core idea of the character was that the Priest was an integral member of the small village community and knew a lot about why the aliens were there, and what they were doing. The aliens in our game are technology-based we envisioned him as a hacker that worked on decoding the alien technology to figure out their secrets and use them to his advantage. This design is of him in the evening looking dishevelled. I chose to keep him in his priest clothes because the visual of a priest hacking creates an interesting contrast. It feeds into the overarching theme of our game is the dichotomy between old traditions and futuristic technology. In our original, full-length version, he would only be interactive through audio so as to save on modelling and animation. But as we were cutting down the game and making the narrative shorter we debated including a glimpse of the priest as an ending to “Part 1” of the game. As we had a full story planned out, but not the capacity to create it, we see the game as being divided into “chapters”, much like how TellTale made their games. This concept was requested as a reference for what he could look like, but since we did not have time to create him, his design was not further explored.

Figure 16
Rigging
Rigging is the process of creating a skeleton for a character mesh and binding it to it, another aspect of this process is to dictate which bones influence what part of the mesh. This is called weight painting. I will be including the binding of the skin and weight painting under the overarching title of "Rigging".
The main focus from a rigging point of view was to make sure the rig, and preferably the weight information, could be reused. My main focus was to save as much time as possible in the rigging stage to be able to spend more time animating. I requested to get the body of the sister as soon as it was in its final stages so that I could start working on the rig early, thus saving time later in the pipeline. While waiting for the body I debated what rigging method would be best. As I wanted to use as much time as possible on animation, the decision was made not to build a skeleton from scratch. Not only is this method more time consuming, but I was also concerned it would not be interchangeable with the brother, as the brother had not been created yet I could not be sure that the skeleton would fit him as well. Thus, that was not an option. I also considered using Autodesk Maya's QuickRig, which I have had good experiences with in the past. However, the QuickRig does not have any finger joints, only wrist joints. This was a problem for multiple reasons. Firstly, I knew the characters would need to be able to pick things up and throw things, which would not look realistic in the hand was only in one position. Secondly, we wanted the game to feel realistic and having characters which didn't move their fingers counteracted the intended realism of the game and could potentially break the immersion of the player. I looked into ways to attach finger joints to a quick rig, but there was no easy solution. Thus, I ended up choosing the HumanIK rig, this rig is more customizable than the QuickRig and it comes with finger bones. The rigging process is more manual and you have more control over the skeletal structure without having to build it yourself. However, it does have some limitations that can heavily impact its general applications.
HumanIK is a Maya “animation middleware is a full-body inverse kinematics (IK) solver and retargeter” (Knowledge.autodesk.com, 2019). I started experimenting with rigging the base mesh for the body on the 20th of February. The character I had received was in A pose (Figure 17), but HumanIK demands the mesh to be in T-pose. You can see in Figure 18 that HumanIK (in the right-hand corner) is showing a yellow error light signifying that the arms could not be repositioned to fit the Model in A-pose. Thus I had to request the character to be repositioned.
These early experimentations led to us being able to sort out a lot of details that could have caused a much bigger problem later in the pipeline. The repositioning of the arms was not a huge problem so early in the modelling process, but if that had occurred with a completed character it would have required complete changes to the body, the clothes, the UVs, and the retopology. So these early testings were crucial to avoiding bigger problems further down the pipeline.
Figure 17
Figure 18
Figure 19
As I mentioned, in the beginning, the intention was to be able to reuse the rig for both of the characters. However, this would rely on the character modeller being able to pose the two different characters identically so that everything from the fingers down to the legs lined up properly, both in mass and position. This is a nearly impossible task, especially when the characters are of different ages and genders. The proportions of a 6-year-old girl's head and hands varies drastically from that of a 13-year-old boy. Thus I was coming to terms with having to rig them both separately. The process of rigging the sister took about 8 hours as I had to learn how to use HumanIK, which involved some trial and error. The skinning and weight painting process of just the body without clothes took approximately 16 hours. I was relying heavily on being able to reuse the weight paint as that is the most time-consuming job. After I learnt how to use HumanIK I was able to set up the rig in around two hours, but weight painting usually takes the same amount of time even if you have the technical knowledge to do it. It varies hugely from mesh to mesh and needs a lot of time to get right. My main concern now was to be able to reuse the weight paint rather than the skeleton. It is also important to note that as I worked on the weight paint for the sister I was conscious of the fact that the final model would have clothes, thus, my main focus was to create a good base to later apply the clothes and then do the detail work when the final model was completed.

Figure 20
Figure 21

Figure 22

Figure 23
Figure 24
When I received the final version of the sister on the 7th of April, the position of the hands had been changed just enough so that I was not able to reuse the original rig I had made for her. The main reason was that the character model was completed much later than anticipated, but the addition of having to redo the skeleton and potentially the weight paint just further supported our choice to minimize the workload and cut out the second character, the brother.
At this stage, I did need to redo the rig, but I managed to transfer the weight information by copying the skin weight from the original model to the final one. I then needed to work on completing the weight paint, now in relation to the clothing, making sure that they deformed in the right way.
Figure 25
Figure 26
In Figure 26 you see the interlacing issue I mentioned, where the mesh intersects with itself. Although this can be somewhat improved through weight painting, it is hard to completely get rid of. I had to fix all of these issues again to try and minimize the deformation. To avoid this problem all-together we should have either avoided a design with big sleeves or simulated the sleeves pointing backwards when the character is in T-pose, rather than downwards. Much like you would do with a character with a tail. This would have made the cloth simulation later much easier and prevented a lot of the intersecting issues.

Figure 27
Figure 28

Figure 29
Figure 25 -27 and Figure 29 shows the first jumper before the weight painting process. There were several hard edges and ugly deformations which needed to be smoothed out with weight painting. I use a plug-in for Maya called NgSkinTools, this is an advanced weight painting tool that gives you more control over the settings. It also has a layering function, allowing for a more non-destructive workflow. Figure 28 shows what happened to the jumper mesh when I tried to weight paint on it using NgSkinTools (Figure 27 is the “before-image”). This was a persistent problem and I could not figure out why it was happening. NgSkinTools worked fine on the body mesh, just not on the jumper. However Maya’s standard Weight Painting tool worked fine on the jumper as well, thus I used that instead. This did not hinder my workflow in any significant way, it just meant I had to be more conscientious about how I worked.

Figure 30
Figure 31
Figure 32
Figure 30-33 shows the mesh after weight painting. Figure 30 is the first weight paint I did on the base mesh. Although I had to re-rig the model later when I received the final version, the weight painting I did her was still a crucial step as I was able to transfer the original weight paint to the new model, meaning I only had to do some minor clean up to smooth out the worst deformations. In Figure 31 you see the updated weight paint for the jumper and body. You can see some deformation in the skin beneath but since one does not see that in the game it was more important to smooth out the jumper.
Figure 33
The process of rigging and weight painting the final character took approximately 12 hours in total. From here I went on to animation and with the time saved from reusing the same character model, I was able to focus on creating clothing simulation as well. After the bases for the animations were done and I started simulating I did a test render and discovered an issue with the jumper. The mesh was two-sided, meaning that when it simulated the mesh intersected with itself and created a flickering. I discovered this on the 13th of April and brought it to Pia, the character modellers, attention. She provided me with a "One-sided" version of the jumper. I now had to re-bind the jumper to the rig. This was not a problem, however, the problem arose with the weight paint, the new jumper's deformation was much stronger than the previous one, it was smoothed out a bit by copying the weight painting data over, but the geometry of the new jumper was different and thus reacted differently. I knew at this stage in the pipeline I did not have time to spend on weight painting again, so I focused on creating the cloth simulation, for the jumper, hoping this would help mask the problem areas of the weight paint. This derived a large amount of modification of the jumper mesh itself because the jumper's arms were so large that when bent downwards from T-pose they intersected the body of the jumper and the body of the girl itself. The main problem with this is that it confused the simulation's collision and the jumper would collide with itself on the inside of the jumper and would not simulate nicely. Therefore I would alter the geometry to minimize the intersection of the jumper. This worked fine, but it took much longer than expected and I spent about 2 days (16 hours) on that alone. I do not think I would have been able to completely remedy the intersection issue even if I had redone the weight pain, but I might have been able to make it a less prominent issue.

Figure 34
Here you can see the render I did that made me aware of the flickering between the two layers which later led to the decision to switch jumpers. Figure 34 shows the jumper’s wireframe.
Character Animation
This job became a bigger challenge for me than I expected. Character Animator was the only role in the group that relied solely on the delivery on another role. Whilst my original intention was to create detailed animation that helped enrich the characters that fit with the realistic style of the game, that became a more and more unrealistic goal as time went on. I was now faced with a different challenge. Working under pressure. The process I had originally wanted to spend 2 months on, was now compressed into 10 days. My focus had to go from creating lush animations to just being able to create animations in time. This was an interesting change of perspective as it challenged my ability to produce content quicker than I would prefer and forced me to make sacrifices in quality in order to be able to deliver the product. I made the choice that it was better that I delivered all of the animations needed at a reasonable level, rather than make one, maybe two, highly detailed animations, and have the rest be at a poor level or worse, sourced from online. This was not an easy choice to make as my artistic integrity does not like submitting work that is not to my highest ability. However, that is what the project demanded. The modellers and programmers had the liberty to work and rework their projects throughout the entire pipeline to create a product to the best of their ability. Whilst I did not start producing my product until the last month before submission, my group members have been able to work throughout the educational year. The original pipeline gave me approximately 2 months to animate two characters, I was expecting 1 and a half month for the sister and then 3 weeks for the brother, with the intention of reusing animations. The original deadline for animation start was in late February. As the pipeline extended further and further past that date without having a character ready for animation, it became apparent that my ambitions as an animator had to change. This project became an interesting challenge because this was my first time being wholly dependent on someone else's work. It challenged my adaptability as a creator and the ability to perform under pressure. The game industry is famously known for having a "crunch time" culture, meaning the last months before a game is packaged are incredibly intense. This project, although not comparable to the intensity in workload as a AAA game, gave me a taste of that work culture. It has made me more flexible and pushed my skill as an animator making me better at producing work with a short period of time. Although it is not my preferred method of working, I recognize the silver lining of the situation, and feel it has in some ways made me a better teammate/employee. My scheduled timeframe was constantly being challenged and being able to deal with being put in that situation has made me a more confident creator.
I started experimenting with the animation workflow early in the year, around the same time I was working on rigging. I had rigged the temporary model I had and done some simple animation, my goal was to test what the most efficient way of importing into Unity would be. My original intention had been to rig the model, then animate in Maya and import only the animations into Unity. It was also suitable for my original intention of reusing animation for the two characters (the brother and sister, this was before we made the choice to only have one character). If the rig was identical for both characters I would be able to import the animation and map it onto the skeleton even if the mesh was different, this would give me more freedom in reusing the animation. However, as it became apparent that I could not reuse the rig this option stopped being viable. Additionally, my simple test of exporting a mesh and just animation into Unity had proved problematic as the animation information would not import unless it was baked into the mesh. Ideally, I would have wanted to further experiment with this solution, but as reusing the rig was also problematic, I decided to look for another option. Baking the animation had proved successful and I knew the coders had been using Mixamo characters and animations as placeholders within the project file. Mixamo is a free online character and animation library which lets you rig your own or download pre-rigged and animated characters. When downloading from Mixamo the animations are baked into the mesh, thus the coders had already set up the character animation filed in the project using baked animations. I asked the coders what they would prefer and they said that doing whatever was similar to Mixamo would be the easiest for them to implement. Thus, I decided to bake the animations as this had not only proved successful in my tests but would also be the most convenient for the coders. It is important to explain why I did not implement my own animations into the Unity project. There were multiple reasons for this, the main one was the code for the character movement in relation to different gameplay elements, such as sneaking, hiding and throwing were not implemented until very late in the pipeline, thus I would not have the ability to add the animation until the last week before submission. Furthermore, we had been using Git to store and update our project file and had run into persistent trouble with the file being overwritten and/or corrupted. Some of these issues were due to Git itself, but a lot was due to human error, where multiple group members would work on the same project and not treat the file in the right way when uploading their files back into Git. Thus, I felt it was easier to avoid cluttering the file even more and since Lee, the gameplay programmer, was able to implement and change the character and character animation quickly it seemed to be faster and safer for him to do it.
In terms of the animations themselves, I focused primarily on getting a good base to then further add details on. The run cycle is a good example of this workflow. I first created the base of the movement, following a great tutorial from Rustyanimator.com (Insert link), I wanted the character's form to be a bit clumsy since she is a child she should not run like a professional athlete, thus I made sure she had some irregularity to her movement and avoided creating a symmetrical run cycle. I pointed the toes inwards to create a more whimsical run. Furthermore, the arms are lifted and the elbows point outwards, this was intentionally done to try and avoid creating a "perfect run". She is also wearing very heavy shoes that would hinder her ability to sprint "elegantly" thus, I wanted the impact with the ground to feel hard, giving the impression that she is running with heavy footsteps. I applied this process to all the other animations as well.
I should also note that after I created the walk cycle I used its first keyframe, the contact pose, as a base for all the other animations. They all start with that as their first keyframe. this was done in an attempt to make the transitions between the animations smoother. Since I did not have time to look into animation blending in Unity, this was the closest I could get to smoothing the transitions between each action. However, after I created all the other animations I went back in and added some more detail to the walk cycle, this means that there is a slight difference in the contact pose for the walk cycle and the first frame of the other animations. Ideally, I would have wanted to have finalized the walk cycle before animating anything else so that I knew that the pose would be consistent throughout, but I prioritized creating a base for all the animations and then polishing them later if I had any spare time. This did lead to minor discrepancies, mainly in the position of the fingers, but that was the sacrifice I made to be able to complete all the animations in time. Another important choice I made was to animate in 60 frames per second. I did some research into what is the best framerate to animate for games in, and some sources said that it didn't matter, but some said that if the game runs slowly you can risk having jittery looking animations. Since a game runs at 60fps, it is usually better to have animations playing at that speed so that the interpolation between the frames runs in time with the game.
As you can see under section D2: Updated Schedule, the number of animation varieties has been cut down significantly. Not only because we changed from having two different characters to two identical characters, effectively halving a lot of the work needed to be done. Additionally, the game as a whole was altered as well. Original features like crawl, lift, clear, scale and equip were cut, due to the programmers not being able to create the code for the action. Although I was looking forward to animating these movements, it turned out to be a good thing as I would not have had time to complete the number of original animations estimated.
The Sneak and Idle Hidden animation are based on the stealth animation from “Last of Us” (Figure 35). Since the main character, there is an adult man I did not want to follow the reference blindly and experimented by making variants that felt more childlike. However, I struggled to find something that felt like “Sneaking” and still childlike. A lot of this was due to the rig’s constraints as well, I could not make the character crouch completely without the knees heavily deforming. I had to work around this and the easiest way to convey sneaking was to create an animation to conformed to the expected norm of this action. Although it isn’t particularly childlike I think when the animation is fairly generic the model makes it look more childlike.
Figure 36
The other variant I created had potential, but it looked more like she was relieving herself than hiding, so I did not pursue it.

Figure 35 : Last of Us Stealth Refrence
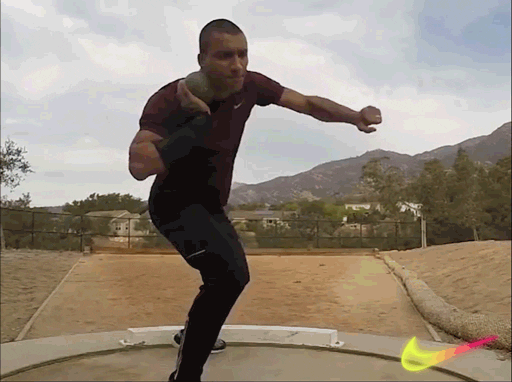
For the Drop and the Pick Up, I went for the simplest illustration of that movement. I wanted to make sure the action was clear and could be easy. The throw is a more dynamic movement than the other two and how you throw can describe a lot about a person. Since this is a young girl I decided to go for a fairly simple shot put throw, but without any flourish. Since she will just be throwing small rocks they would not be as heavy as a shot put, thus there would not be a need for as much anticipation and follow through (anticipation and follow through are two of the 12 principles of animation). I had wanted to add more follow-through to show that release of energy, however making that kind movement look realistic derives a lot of work, which I did not have time to do at a high enough level. Thus, I tried to distil the movement down to its core components.
I have discussed the creation of the Run cycle earlier in the portfolio. You can see here the run cycle. In earlier iterations, I had emphasized the turned in knees and toes even more, but in the final version of the animation, I evened this out and made it less prominent. I had pushed it too far so it looked almost comical and since we are striving for realism I had to make sure the run felt balanced and not stylized.
The Walk was one of the first cycles I worked on. Below are two renders I did of earlier versions. This will give you a sense of the progression that all the animations went through.
As you can see Walk_01 has stiff arms and fingers and the head bobs in a very robotic way. I fixed these issues in Walk_02 where I added more movement to the hands and arms. Note that Walk_02 is rendered from a 3rd person point of view because I wanted to see what the movement looked like from the player’s perspective.
However, this walk still had some issues with the overall weight and the legs glitched at the beginning of each cycle. The final version is seen in Sister 2 Walk. Here there are more details to the hands and the transitions between cycles have been smoothed out further.
Above are all the animation cycles created for the game. As both of the sisters had interchangeable animations I have uploaded some of the sister with the backpack and some without just to avoid having duplicate animations where the only variation is the backpack. The only two personalized animations are the Idle Scout and the Idle Kick, these are idle variations ment to create some variation from the standard idle. It is also intended to create some personality difference between the two of them. One is kicking the grass impatiently and the other is nervously looking around. This is the only set of unique animations attributed to only one specific character.
Clothing Simulation
Cloth simulation is the process of giving a mesh the qualities of fabric and simulating the movement of it using physics within a 3D package. As I mentioned earlier in relation to weight painting the updated sweater mesh that Pia created, it had a lot of heavy deformation, especially in the armpit. Thus my intention was to use clothing simulation to obscure some of this. Creating the simulation itself was fairly straight forward. I mark the jumper as a nCloth object, and the body as a Passive Collider, then I simulate the cloth to see how it flows with the animation. In most cases, I need to add Dynamic Constraints to prevent the mesh from sliding off the body. I also modify the properties of the cloth to make it slightly more rigid and less bouncy as the design describes the jumper as a traditional knitted sweater which is usually made out of heavy wool and has a lot of structure to it. Then when the simulation was satisfactory I would create a nCache and create a seamless loop of the simulation in the Trax Editor. For the original sister, I simulated the jumper, then when I received the backpack for the other sister, I started simulating the jumper there as well, but It persistently glitched and enveloped the backpack straps, even though the backpack was a Passive Collider. There are ways to work around this issue, but it would take some time and as I received the completed backpack on the 28th and the postponed deadline for submitting animations to the programmers was the 30th, I did not have time to troubleshoot this on every animation. Instead, I decided to not simulate the jumper and rather focus on the accessory on the backpack. This was a very nice effect and would have looked very nice in the game if it were not for the export issue.
The reason the clothing simulation isn't in the game is due to me being unable to bake the simulation information and export it as an FBX. Initially, I tried just to export the animation as an FBX and bake it in the export, which had worked before with the animation. But as I handed it to the programmer to implement it turned out that not only had the simulation not baked, but the jumper was not even included in the export. I tried to find some sources on how to potentially solve the problem. The only thing I could find as a quick fix was to bake the simulation in Maya, using Edit - Keys - Bake Simulation. This seemed to have worked for other people, but no matter how much I tried I could not get it to bake properly. I baked and exported the file in approximately 25 different ways and none of them exported properly (I checked by importing it to Unity myself so that I did not cause extra work for the programmer). Being at a complete loss I turned to my group for help. Maris suggested looking into an Alembic export, which I had no experience with. Ed offered to help and worked on the file for a while. After a couple of hours, it seemed he had fixed the issue. Although I had wanted to be more involved in the solving of the export issue, I know that I would not have been able to solve the problem as quickly as he did, thus I greatly appreciated the support from him in that situation. We then sent the file over to the programmer to see if it would work within our game file, then we planned to meet up two days later to export the rest of the files together, as I was interested to learn how he had exported the simulation. However, as the programmer tested the file it did not work, stating that there were "missing scripts". At this point, I made the choice to not add the clothing simulation in the game as the troubleshooting would involve, not only me but two other members of the group. I could not justify taking up their time just to help me when we were already behind schedule. I should have researched how to export clothing simulation earlier, but I foolishly believed that I would be able to bake the simulation in the export and did not think it would be a problem. Thus we ended up with no simulation for the jumper and the backpack and when the cloth information was removed the animation exported perfectly as a baked FBX. Earlier in the pipeline, I also looked into simulating in Unity, which would have been a viable option, but since we had had so many problems with people using Git wrong and corrupting the project I decided it was best for me to stay away from the actual Unity project and rather try simulating in Maya. Which is what led to the outcome we have today.
Below you see the cloth simulation for the animations. As a note some of these animations were updated at a later point when I added the new jumper I also tweaked them a tiny bit more and smoothed them out before finally exporting and zipping them.
I want to note that I looked into a couple of services that provided MEL script for Maya and a plugin for Unity that would make it possible to export nCloth simulation between the software. It was fairly cheap and I debated purchasing it. However, the service also derived some coding on the Unity side and as I knew that the programmers intended to do the majority of the coding in the last week before submission I felt it best not to add extra work and rather focus on making the import of the animation as simple as possible as to make sure that it could be implemented in time. In making this choice I took away any cloth simulation and used a new jumper that Pia had made to flow around the backpack better. I used this jumper for both characters as it did not only fit better on the sister with the backpack, but it also had less fabric under the arms meaning that it deformed less than the original sweater. This lead to the import being much easier for the programmer, whilst avoiding the worst of the mesh deformation.
Summary
To summarize, this project was heavily affected by poor time management. The lack of overarching deadlines made people only work in relation to their own personal pipelines, something that made it hard for the group to function together. We also had several issues with Git causing even more delays. Some of these issues could have been remedied by a stricter group structure. Having a project leader would have been a good source of this structure. In relation to my personal work, I should have done more research into the workflow between Maya and Unity, in relation to the clothing simulation. More individual trials within my own area of responsibility would have led to a seamless export/baking and eventual import to Unity which would have strengthened the overall product. Finally, I should have calculated a bigger contingency period to account for unforeseen delays. On a whole I am pleased with the work I have put in. I have been made aware of flaws in my approach to new techniques, something I will be more aware of in the future. I have been pushed and challenged as an artist and an animator. Furthermore, this project has given me a better idea of how it is to work through an entire pipeline in a team. An invaluable experience that will make me a better co-worker later.
References
Assetstore.unity.com. (2019). Maya To Unity Anim - Asset Store. [online] Available at: https://assetstore.unity.com/packages/tools/animation/maya-to-unity-anim-83410 [Accessed 28 Apr. 2019].
Guide to Iceland. (2019). A Guide to Icelandic Runes. [online] Available at: https://guidetoiceland.is/history-culture/a-guide-to-icelandic-runes [Accessed 1 May 2019].
Knowledge.autodesk.com. (2019). HumanIK | Maya LT 2017 | Autodesk Knowledge Network. [online] Available at: https://knowledge.autodesk.com/support/maya-lt/learn-explore/caas/CloudHelp/cloudhelp/2017/ENU/MayaLT/files/GUID-EDBDA3DB-4715-40EF-9ADF-412F78BFF98E-htm.html [Accessed 1 May 2019].
Long (2019). Iceland Latitude, Longitude, Absolute and Relative Locations - World Atlas. [online] Worldatlas.com. Available at: https://www.worldatlas.com/webimage/countrys/europe/iceland/islatlog.htm [Accessed 1 May 2019].
Rusty Animator. (2019). Rusty Animator | Reach your dream job. Learn how to animate and level up.. [online] Available at: https://rustyanimator.com/run-cycle/ [Accessed 13 Apr. 2019].
Stålenhag, S. (n.d.). Åkersnuten. [Digital] Stockholm.
Stålenhag, S. (n.d.). Bonareaktorns Kyltorn. [Digital].
Stålenhag, S. (n.d.). Closing The Loop. [Digital] Stockholm.
Worldpopulationreview.com. (2019). [online] Available at: http://worldpopulationreview.com/countries/iceland-population/ [Accessed 1 May 2019].